Journey through porting LR2 play skins to beatoraja
- TL;DR
- Preamble
- Prerequisities
- Out of the box experience
- Scaling, aka #RESOLUTION
- Font conversion
- Sticking scratch laser
- Primer on LR2 skin format
- Lift
- EX-HARD and ASSIST gauges
- GN display
- FAST and SLOW
- Bilinear filtering
- Skin elements not loading?
- Closing words
- Sources
TL;DR
- LR2 play skins can be made to work with beatoraja like it was a native skin
- Depending on what you want to achieve, you might only need to convert a couple files and change some in-game settings, OR you may need to dive into the skin files themselves and do some dirty coding work
- No, I don’t know how to fix Bluewhite or KCOOL
Preamble
As a “rytmiczny świr” I have always tried to convince as many people as possible to try out BMS. And if someone is already a BMS playa, I try and make them to switch away from LR2 to beatoraja. There might be slight fanboyism here at play, but in the grand scheme of things they’d be better off playing on software that was not abandoned 10 years ago and that doesn’t force you to use outdated standards (background videos only in .mpg format, sheesh).
One of the “against” points I tend to face is will my favourite skin work? The answer is “yes”, because exch-bms2 - the main author of beatoraja - has implemented backwards compability for Lunatic Rave 2 themes in the beatoraja skin format.
Sadly it’s not all fine and dandy, as there is manual work required. If you get lucky, it might end at converting a couple files, and if not, you will need to edit the skin .csv files by hand, and for that you’ll need some basic knowledge of the format.
In this post I’ll walk you through the process of “editing” a skin to make it work as close to the author’s intention as possible. All the info provided here comes either from my own research (reading through the code of beatoraja and its native skins) or from posts from other people, which I’ll link at the bottom of the post.
Prerequisities
Depending on how far you’ll need to go to make your features work, you’ll need one or all of the following:
- dxa_decode.exe from Lunatic Rave 2
- This will be used to unpack
.dxaarchives, which most LR2 skins use to store fonts in, as beatoraja cannot process these files natively
- This will be used to unpack
- A spreadsheet editor like Microsoft Excel, OpenOffice Calc or Google Sheets
- The code of LR2 skins is contained within
.csv(comma separated values) files, which in theory can be edited with a text editor, but using a spreadsheet editor makes the files way more comprehensive to read. In order to backport certain beatoraja-exclusive features, we’ll need to go down into the nitty-gritty
- The code of LR2 skins is contained within
- An image editor
- This may or may not be required depending on how the skin is structured internally
Out of the box experience
In this example I will be using the stock Lunatic Rave 2 skin, “LR2 STANDARD (7 KEYS)”
In order to add a skin to beatoraja, you have to copy its directory to beatoraja/skin. That simple.
After that you will be able to load it either in the config menu (through the Skin panel), or directly in game (by hitting F12).
There is a couple options you can tweak there, but let’s not bother with that for a minute. Let’s instead fire up a song and see what happens.
yeah…this ain’t right…
So right off the bat there is a couple glaring issues
- Artist and title are not present
- Rotating elements are way off
- Gauge does not respect EX-HARD setting (yep, it was set here)
- LIFT only affects certain skin elements
Luckily all of these can be addressed with editing the files one way or another, but first let’s tackle a problem, solving which will prove very useful in the future.
Scaling, aka #RESOLUTION
Beatoraja’s scaling implementation is by no means perfect. Above you saw how well it handles rotating images - that’s an issue which occurs if the skin’s intended aspect ratio differs from the game’s aspect ratio. In the example above I was running a LR2SD (thus 4:3) skin in Full HD (1920x1080, which is 16:9). Funnily enough, if you run the game in a 4:3 resolution, those issues will be gone from LR2SD skins, but there’s no telling what would happen to LR2HD skins.
HD skins
Sadly, beatoraja has no way of telling a skin’s intended resolution/aspect ratio on its own. If you tried to load a LR2HD or LR2FHD skin like WMIX or EndlessCirculation without any prior edits, you would only see a small chunk of the screen.
Turns out the required edit is contained within a single line you need to place in your skin’s .lr2skin file.
First you need to locate and open said .lr2skin file in a text editor of your choice. In our case it’ll be located under skin/LR2/Play/play_7.lr2skin.
It’ll look something like this:
//,type,title,maker,thumbnail...
#INFORMATION,0,LR2 STANDARD (7KEYS),cyclia,LR2files\Theme\LR2\Play\ss_7.png
//typeは,,,,
//0 7KEYS,,,,
//1 5KEYS,,,,
//2 14KEYS,,,,
//3 10KEYS,,,,
//4 9KEYS,,,,
//5 MUSICSELECT,,,,
//6 DECIDE,,,,
//7 RESULT,,,,
//8 KEYCONFIG,,,,
//9 SKINSELECT,,,,
//10 SOUNDSET,,,,
//11 THEME,,,,
All we want to do in here is to add a new line at the beginning of the file and add the following:
#RESOLUTION,x
where the x is:
1for LR2HD (1280x720) skins2for LR2FHD (1920x1080) skins
After that’s done you save the file and try loading a song in beatoraja. You should see that it now appears in all its glory!
Fixing the rotation in SD skins
The same edit will allow us to fix the oddly rotating elements in SD skins, with one side effect - now the skin will only take up a small chunk of the screen’s real estate.
To combat this, go into skin settings (in config window or in-game through F12) and scroll down until you see All offset(%) options. These will allow us to move and resize the skin to our liking without affecting the internal resolution, so it will not screw up the rotation again.
Below are examples of recommended values and their results.
| x | y | w | h | Result |
|---|---|---|---|---|
| 0 | 0 | 0 | 0 | 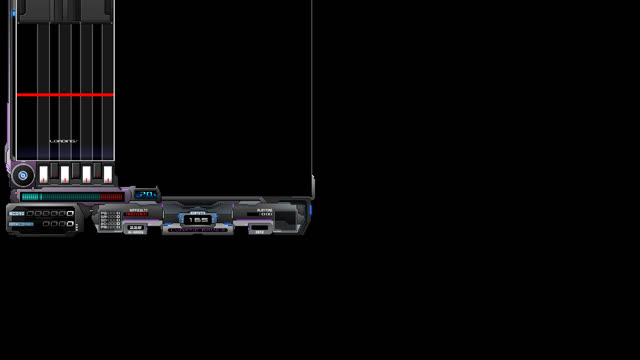 Only a chunk of the screen is used Only a chunk of the screen is used |
| 0 | -50 | 50 | 50 |  4:3 aspect ratio, aligned to the left (useful for CS size skins) 4:3 aspect ratio, aligned to the left (useful for CS size skins) |
| 25 | -50 | 50 | 50 |  4:3 aspect ratio, aligned to the right 4:3 aspect ratio, aligned to the right |
| 12 | -50 | 50 | 50 |  4:3 aspect ratio, aligned more or less to the center 4:3 aspect ratio, aligned more or less to the center |
| 0 | -50 | 100 | 50 |  Stretched across the screen (useful for AC size SD skins) Stretched across the screen (useful for AC size SD skins) |
Font conversion
As stated in the beginning of this post, beatoraja does not natively handle .dxa files. They have to be unpacked prior to use.
It turns out that most skins will deliver fonts in that format, which will result in missing titles in beatoraja. To fix this we only need to unpack the fonts.
First locate the font .dxa files (usually they’re inside a “font” folder…big shocker, I know), and then drag and drop each one onto dxa_decode.exe that you got from Lunatic Rave 2. It’ll create a folder containing graphics and a .lr2font file, which beatoraja will happily process.
If for whatever reason the conversion doesn’t happen (may happen with filenames containing foreign characters), you may have to temporarily rename the file for the conversion process, and then rename it back.
In our case, oddly enough, the font files are in the skin/LR2/Select directory. Converting all of them will satisfy beatoraja, which now shows titles during the load process.
| Before | After |
|---|---|
 |
 |
Sticking scratch laser
If you’re a keyboard player, you can skip this part.
Most, if not all BM controllers bind the turntable digitally to an axis (for example clockwise turn means “Up” while a counter-clockwise turn means “Down”). As an anti-ghosting measure, after you’re done turning, the axis will stay “pressed” for some time, usually around half a second. The side effect is that when you use the scratch in-game, the laser will stay on for that period - and that doesn’t look pretty. Many players have simply got used to this visual bug. The fix is pretty simple though.
This is where we start delving into .csv files. The structure will be explained as we go.
First locate the file of interest (in our case it’s under skin/LR2/Play/7keys/7_LL0.csv - this may differ depending on the implementation in the .lr2skin file) and open it in your spreadsheet editor of choice. Then you want to find the part of the file responsible for lasers (Search for laser off or レーザーオフ).
You will see many lines of stuff, which look like this:
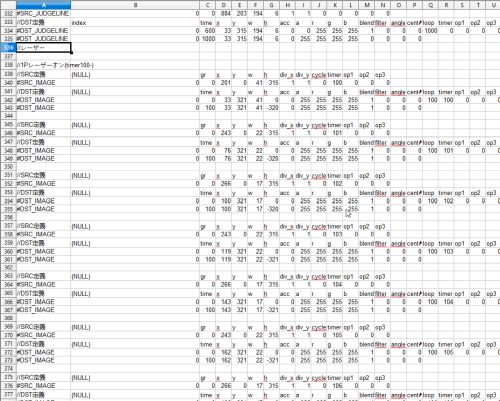
Right now we’re interested in a chunk, which timer value in the #SRC_IMAGE row equals to 120.
timervalue is used to tie a property to an in-game event. In this example value of120corresponds to letting go of the Scratch button.
Now select and copy the rows related to this chunk (should be one row starting with #SRC_IMAGE and two with #DST_IMAGE).
We want to paste this over the “laser on” chunk, which shouldn’t be that far away - just scroll up a bit until you see a row in which the timer value equals 100.
When you find it, paste the previously copied “laser off” chunk over it, and change the timer value in the #SRC_IMAGE row from 120 to 100 and save the file.
Primer on LR2 skin format
The following parts will require basic knowledge of the LR2 skin format, so we’ll go through that quickly.
Nothing in excruciating detail, just enough to get going.
The skin language does a single pass, meaning that it’s executed once when you load the skin. This also grounds the hierarchy of all the skin elements, meaning that the further down in the file is an element placed, the closer to the foreground it’ll appear (e.g. fail shutters will appear at the very end of the file so that they’ll cover everything).
Around the beginning of the file there are declarations of images and fonts. They’ll look something like this:
| //画像定義 | filename |
|---|---|
| #IMAGE | .\LR2files\Theme\LR2\Play\frame*.tga |
| #IMAGE | .\LR2files\Theme\LR2\Play\close*.tga |
| #IMAGE | .\LR2files\Theme\LR2\Play\bomb*.tga |
| #IMAGE | .\LR2files\Theme\LR2\Play\lanecover*.tga |
| #IMAGE | .\LR2files\Theme\LR2\Play\turntable*.tga |
| #IMAGE | .\LR2files\Theme\LR2\Play\fullcombo*.tga |
(Don’t worry about the path being incorrect for beatoraja, the .\LR2files\Theme\ bit is corrected internally by the game itself)
Each of these will be assigned to a gr parameter in order, meaning that frame*.tga will be assigned a gr value of 0, close*.tga will be assigned a gr value of 1 and so on.
The asterisk means that it’ll choose randomly from all the files that fit the wildcard, unless such file was defined in the .lr2skin file under #CUSTOMFILE, in which it’ll use the file chosen from the skin settings menu.
There are multiple commands and variables defined within this language. A full list of them (compiled by ovnz) is available here. They’re divided into multiple categories:
- image - used for calling images which are always defined the same way, namely black/white still frames, song banners or backgrounds
- num - used for storing numerical values like current hi-speed, combo or score
- timer - used to indicate various events happening within the game engine like announcing failing a song, successfully downloading scores from the IR, or even just hitting a note
- op - booleans used to store various states like the judgement for the last note hit or presence of a BGA
- text - used to store various strings like song title or the current folder
Let’s now bring up a skin element that has been called inside the file:

When you call an element, you need to define a #SRC_ and a #DST_ line.
A #SRC_ line relates to what part of the image (defined by gr) we’re pulling: x and y are the origin point of our texture within the file, w and h describe the dimensions, and div_x and div_y define the amount of horizontal and vertical segments contained within that bit (which will be cycled through every amount of miliseconds defined in cycle). This entire bit of code will be called when the timer defined in the timer field is activated. In this case it’s timer 50, which corresponds to a bomb being triggered in the 1P scratch lane.
A #DST_ line describes how the image will behave when this bit of code is triggered. time is an amount of miliseconds which have to pass between triggering the code and the event itself happening. x and y are the origin position of the element on the screen, while w and h are its dimensions. If w and h are not the same across #SRC_ and #DST_, there will be stretching. a, r, g and b correspond to the 8-bit RGBA values of the texture (so if you wanted to make a green-tinted image, you’d set everything but g to 0, and keep that one at 255). filter toggles bilinear filtering for the texture, angle sets its rotation and loop sets the amount of miliseconds after which this line of code will trigger again. op values are conditions which will have to be met for this bit of code to execute (with exceptions).
Lift
Let’s move on to backporting new features into LR2 skins. First one we’ll tackle is Lift, which will raise the bottom of the playfield by a defined amount. It’s used mostly when you want to achieve lower “green number” without drastically increasing the note speed, but your playing setup disallows use of a lane cover (for example your point for reading notes is too high for the lanecover to be viable).
LR2 skins will have fundamental support for this feature in beatoraja, but only partially.
Lifting missing elements
The program is not taking shots in the dark on what should be lifted and what should be not, so on its own it only lifts element that it’s sure about - notes, judge line, judgements and combo - while leaving everything else intact. Those intact elements include judge detail (ghost), judgeline glow, lasers and bombs. To fix these, we’ll need to edit each call with one simple parameter.
Let’s go back to the bit of the .csv I showed you in the previous point - you can see that there is three op fields. Actually there’s an op4 field available which was barely used in LR2 (it was only used to signal rotation of the element when the scratch is used), but it’s got a new purpose in beatoraja.
If you set the op4 to 3 in the desired element’s #DST_ line, it’ll be shifted upwards by the lift amount.

You can use it to lift any element you desire, but we’re looking for specific one. The table below will help you find them by their timer value from #DST_ line. When you’re searching for a value, search only in a column where you know it’d be located

timer value |
used for | used in |
|---|---|---|
| 140 | beat | Judgeline flashing |
| 50-57 | bombs | Bombs |
| 70-77 | LN bombs | LN Bombs |
| 100-107 | hitting a key | Laser |
| 120-127 | letting go of a key | Laser off |
Most skins will have multiple options for the position of the judge detail, and the code responsible for them can usually be found by looking for TYPE A. You can tell it’s the detail if the num value in the #SRC_ row is set to 108, which is the difference in EX score between the current play and the target score.
| Before | After |
|---|---|
 |
 |
Lift cover
On the images above you can see that even after lifting the missing elements there’s still a glaring sonuvabitch of a hole left between the buttons and the judge line. While you could bake in a ghetto lift cover for one specific lift height, beatoraja offers us a far more elegant solution: a LIFT call. In short it works like a lane cover for lift. Wow.
First of all we need to decide what do want to use as a lift cover. I like to use the default lane cover for the skin, but you may want to add your own thing, or use what’s the current lanecover using. Here I’m only going to cover the process of using a single image - for reference on adding a selection, refer to how lane cover is implemented in the .lr2skin file.
So, in order to define a static file, we need to scroll way up to the #IMAGE definitions and drop our own in there.

Now we need to locate where is the lane cover exactly called in the code. In the image above we can deduce, that it has a gr value of 3. Lane covers are called with a SLIDER. So let’s search for a #SRC_SLIDER with a gr value of 3.

We’ve found the lane cover! Now let’s make a couple of empty rows below that and copy it whole. There’s a couple of changes that we want to make here with our new copy:
- Change
#SRC_SLIDERand#DST_SLIDERto#SRC_LIFTand#DST_LIFTrespectively - in the commented out
SRCline removemuki,range,typeanddisable. PutdisapearLineandisDisapearLineLinkLeftin their place (this is totally optional but serves as a visual aid) - Remove the values of the fields you deleted in the previous line, set
disapearLinevalue to be the same ashandisDisapearLineLinkLeftto 0 - invert the sign of
yvalues in both#DST_LIFTrows so that positive is now negative and vice versa

This happens to work like a charm for LR2, just look at it go!
Keep in mind that this is not a one-size-fits-all solution, some skins may require additional steps to make them work.
EX-HARD and ASSIST gauges
Lunatic Rave 2 did not have EX-Hard or Assisted Easy gauges, so naturally LR2 skins do not implement these in any way. The backporting process is pretty straightforward however. It may vary depending on how your skin is structured.
First of all locate the GROOVEGAUGE call in your skin. Then you want to make around 12 empty rows under that, and copy the entire GROOVEGAUGE block 1 or 2 times depending on your needs.
Turns out that the current gauge is signaled by different op parameters, and that can be used to control the current gauge texture.
Those ops work as follows:
| Gauge type | op 1046 gauge_ex |
op 42 gauge_groove |
op 43 gauge_hard |
|---|---|---|---|
| (Assist) Easy | yes | yes | no |
| Groove | no | yes | no |
| Hard | no | no | yes |
| EX-Hard | yes | no | yes |
With that knowledge we can take 2 approaches to the process, either:
- Copy the gauge block once and assign a different texture for op
1046gauges - Copy the gauge block twice and assign different textures for both Easy and EX-Hard gauges
Below I’ll describe the process for the first approach. The other one only requires for the two new gauge blocks to check for ops 42 and 43 on top of 1046.
For starters, we’ll need to define a gauge texture with colors corresponding to the state we’re interested in. Some skins like WMIX, ILAS or GirlishCafe store gauges in separate files, which makes the defining process that much easier, but if that’s not the case, we’ll need to extract the gauge from another file and adjust our code block a bit.
First locate the file in which the gauge is stored (in our case the #SRC_GROOVEGAUGE line calls for gr of 0, so we’re interested in a file from the skin\LR2\Play\frame directory). Then we can use the coordinates from #SRC_GROOVEGAUGE to locate the gauge texture and extract it into a separate file, which then we can define in the #IMAGE block.

On the left: original gauge from the default frame file
On the right: my edit which follows the simple-7keys color scheme
Now back to the code…
For the commented DST line in each block you want to add op1 through op3 at the end, if they don’t have them, purely for visual aid. Now in the first #DST_GROOVEGAUGE line of the first block you want to make the op1 value into -1046 (a minus sign is a “not”, so here’ we’re checking if we are not in an EX gauge), and 1046 in the other block.
The first block is done, but the other one needs some more work, since we’re using a different texture for it.
All the changes that need to be done are within the #SRC_GROOVEGAUGE row - change the gr to point to your newly defined gauge texture, and change x and y to 0, so that they point to the origin of the image.
And there it is!
GN display
beatoraja has the ability to display a lot of numerical values that LR2 did not even implement, like lift number, speed values at minimum and maximum BPM and such. In this example I’m gonna show you how to show the IIDX Green Number.
First of all, find a block which #SRC_NUMBER row has a num value of 14 (lanecover1).
Add a couple of rows below that block and make a copy. Now change the num value in the copy to 313 (which corresponds to the IIDX GN) and change the r and b values to 0, so that our Green Number is truly green.
You’ll also want to change the x value in both blocks’ #DST_NUMBER rows to space them out a bit, so that they don’t overlap each other.
By the way, remember the op4 thingy from back when we were fixing Lift? Well, turns out you can also use that op to make elements follow the lanecover! Just set the op4 value to 4 and then tweak the y values in both #DST_NUMBER blocks to your liking!
FAST and SLOW
This bit has taken me the longest time to figure out. Long story short, there’s two ways going about this, either:
- Use beatoraja’s built-in fast/slow display (quick and dirty, but gets the job done)
- (Re)implement your own Fast/Slow display (requires (re)writing a bit of the code related to showing F/S)
Built-in display
Each LR2 skin loaded into beatoraja can make use of the built-in fast/slow display, which can be in traditional text form, or can show how much miliseconds were you off. All of this and positioning of the detail can be changed in skin settings.

The options available for all LR2 skins by default
While this is very simple to set up, respects LIFT options on its own, and is fully movable and customizable, you’re stuck with the default font (the same used for all the tickers at the top of the screen), which you may not end up liking.
Bring Your Own Fastslows
This part can be also applied if you want to implement your own F/S display Certain LR2 skins like WMIX or Bluewhite were designed to take advantage of certain LR2 hacks, which implemented a Fast/Slow display. While there is F/S stuff exposed to the skinmakers, it’s fundamentally different in beatoraja, so there is more work involved in re-enabling the display.
As the default LR2 skin does not even implement that, we’re gonna jump over to WMIX for this example, specifically the file skin\WMIX_HD\play\csv\wide_1p.csv.
In order to locate the code responsible for Fasts and Slows, just look for “FAST”.
In this case it’s located near the end of the code.

This chungus is responsible for displaying Fasts and Slows
We cannot use this code in its current form because the num value 210 which was used to signal whether you hit fast on slow in LR2 hacks has been repurposed in beatoraja as the number of players who have failed a chart. Besides, ops 242 through 245 used to signal whether you hit something that basically wasn’t a PGreat are now obsolete, as beatoraja exposes ops 1242 and 1243 which signal an early and a late hit respectively.
So instead we’re gonna write our own code to replace the non-working stuff, but first let’s walk through what we have in here.
The chunks we’re looking at use a hacky method by having the fast/slow textures represent the number held in the num value 210. The only difference between the two 4-chunk parts is op1 which in one case is 35, and in another is -35 (this op tells us whether “Ghost A” (above the judgements) is enabled).
First we’re going to get rid of all but one chunk in first half, so that we have reference for position.
Then you want to find an IMAGE chunk in the code which has one #SRC_ row and two #DST_ rows and copy that in each half of the F/S part. We’re going to use these as base for implementing our own thing.
Now open the image which is assigned to the gr value used in the F/S #SRC_NUMBER row. Use your favourite image editing software to pinpoint the origin point of the FAST ticker (you’re looking for a rectangle which has w and h dimensions). In our case the origin point has a x of 60 and y of 32.

Finding the origin point in Photoshop 2020
After that you want to copy over certain elements from the original NUMBER chunk to the new IMAGE chunk:

The elements you want to copy over are marked in green
You also want to copy timer values both from #SRC_NUMBER and #DST_NUMBER rows, and set all the op values in #SRC_ to 0.
If your skin distinguishes the placement of the F/S ticker based on the presence of the Ghost, you’ll want to set op1 to either 35 or -35. op2 should be set to 1242.
Now save the .csv and check if you can see FASTs in-game (you should, if you can’t then hit me up). Now copy the IMAGE chunk we’ve just created and paste it right under the original. In that one change op2 to 1243 and change the x and y in #SRC_ to point to the SLOW graphic.
Don’t remember to set op4 to 3 to make the ticker follow Lift!
Look at it go!
Bilinear filtering
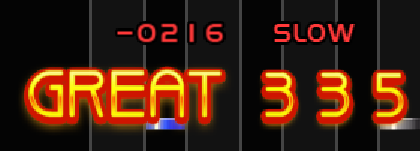
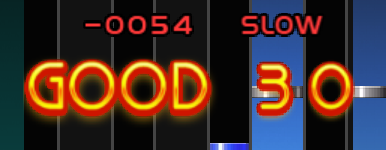
When you load a LR2 skin into beatoraja, you may notice that some elements look more pixelated than others. Turns out that the skin format allows for a filter flag, which will enable bilinear filtering for a called element. You can see it in the previous point in the #DST_ segment. Sadly you can’t just apply a filter for the entire skin - you must apply it on per-element basis. But boy, it does improve the visuals.
 |
 |
|---|---|
filter set to 1 only for the Ghost |
filter set to 1 on Ghost, F/S and Judge |
Skin elements not loading?
I have encountered this specific issue with EndlessCirculation and CB_MODOKI skins (they use similar .csv files). If you open any of its .csv files in a spreadsheet editor, you’ll notice something peculiar about the way the define #IMAGE files:
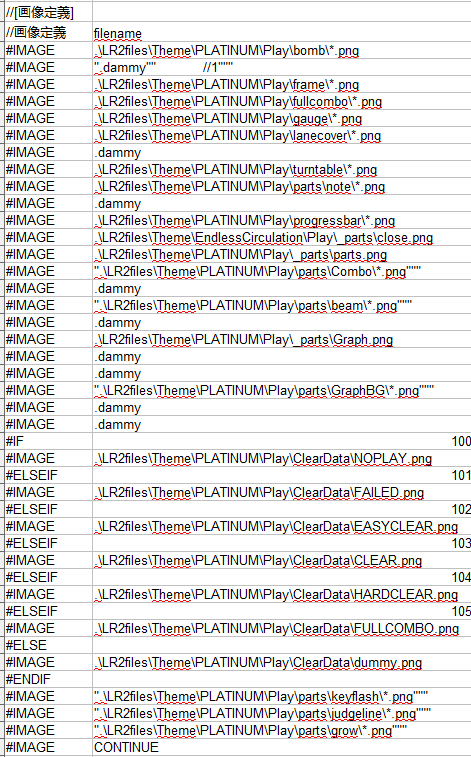
This looks “"”normal”””
For whatever reason the creator of this skin used an excessive amount of quotation marks. While LR2 will gladly take these and use them properly, it’ll knock off beatoraja’s backwards compability and not load an image, resulting in mostly black playfield. The solution is simple - remove the excessive quotation marks.
Closing words
Next time someone tells you that they won’t switch to beatoraja because they can’t carry over their favourite skin, you can tell them to fuck right off! Writing this entire thing helped me understand how LR2 (and in turn, beatoraja) skins work under the hood, and that may push me into writing my own skin one day.
Naturally I’ll share the LR2 skin files I’ve edited for all of this, so that you can see and compare the changes yourself.
LR2 Standard 7keys 1P with Lift, EXH gauges and GN display (remember to change All offset(%) values in settings)
WMIX AC 1P with Lift, EXH gauges, GN and F/S + Wide 1P with just the F/S
While I’m glad that all of the things I described above are possible, I really feel that the majority can (and should) be integrated into beatoraja’s code. Hell, LR2’s “press 4 and arrows” way of achieving Lift works better than beatoraja’s out of the box solution! Of course, it gets knocked out of the park once you add edits to the skin, but you shouldn’t need to do that yourself!
I really hope this comes in handy to anyone who’s interested in general skinning manners. To my knowledge this is the first article on the topic fully in English. Gotta make that BMS cab pretty.
And before you ask: No, I couldn’t get KCOOL or Bluewhite to work properly with beatoraja. There’s just something odd about them that beatoraja doesn’t like. If you do figure out what’s wrong with them, please get in touch.